Selectively adjust the color values in an image
You use the Color adjustment controls to selectively adjust the red, green, blue, cyan, magenta, and yellow colors in an image. Each color has individual Hue, Saturation, and Luminance controls. If you need to adjust the hue, saturation, and luminance of a color that doesn’t appear in the Color controls, you can use the Color eyedropper to identify a hue in the image that needs adjusting.
Although segmenting control of hue, saturation, and luminance on a per-color basis may seem complicated at first, restricting these adjustments to specific colors helps correct and enhance targeted colors without affecting others. In addition, Aperture provides Range controls used to set the extent of colors affected by the Hue, Saturation, and Luminance adjustments. The extent of colors affected by these adjustments is also known as chromatic spread. You use the Range controls to fine-tune your color adjustments.
You can also brush the Color adjustment on selected parts of an image. For more information, see Apply brushed adjustments.

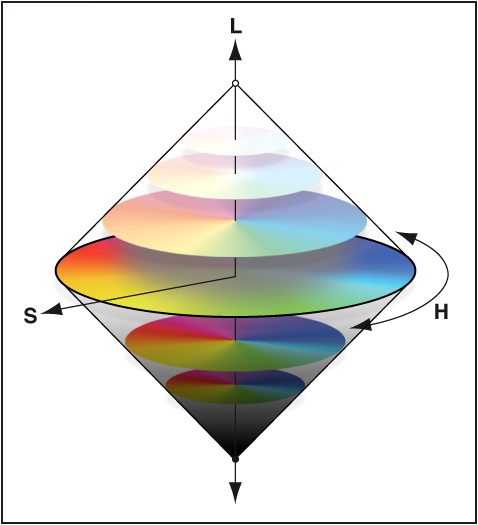
Hue, saturation, and luminance describe the characteristics of a particular color:
Hue (H): Describes the actual color itself. Hue is measured as an angle on a color wheel. Moving a Hue slider in Aperture remaps the color from its original position on the color wheel to the new position indicated by the slider. Hue adjustments are often made to match the color of the same subject in different images. Adjusting the hue of an image is particularly useful when the subject you shot moved between various lighting conditions. Another advantage of adjusting the hue of an image is that camera models of different types or from different manufacturers rarely capture and render color exactly the same way. You can use the Hue controls to match the color of a subject shot by two different cameras, so that when the images are placed side by side, they match.
Saturation (S): Defines the intensity of a specific hue. A saturated hue gives the color a vivid and pure appearance. A less saturated hue appears flatter and more gray. A completely desaturated hue becomes a shade of gray.
Luminance (L): Describes the brightness of the selected color. An increase in luminance brightens the selected color value. A maximum luminance adjustment results in pure white. Conversely, a decrease in luminance darkens the selected color. A minimum luminance adjustment results in pure black.
Adjust a color value in an image
When you want to adjust the color values in an image, you must first identify the colors that have the most influence on the colors you want to change. It’s important to understand that you’re adjusting the colors of the image within the RGB spectrum; you reduce yellow when you increase blue, you reduce magenta when you increase green, and so on. When you want to isolate a color and adjust its hue, it’s important to identify the color’s location on the color wheel. For example, if the color value is closer to cyan than blue, you may decide to adjust the cyan hue value without adjusting the blue hue value. Depending on the image, you may decide to adjust both the cyan and blue hue values to achieve the color values you’re looking for. There’s not just one correct way of perfecting the colors in an image. Your approach should be based on the image’s subject and the overall aesthetic you want to achieve.

Select a photo.
In the Adjustments inspector or the Adjustments pane of the Inspector HUD, choose Color from the Add Adjustment pop-up menu (or press Control-C).
-
Click the color you want to adjust to view its Hue, Saturation, Luminance, and Range controls.
Note: You can also click the Expanded View button to expand the Color area to show the controls for all colors at the same time.

-
To remap the hue of the selected color in the image, use the Hue controls.

Depending on the color you selected, you can remap the hue in the following ways:
Red: Decreasing the hue value moves the hue toward magenta, and increasing the value moves the hue toward yellow.
Yellow: Decreasing the hue value moves the hue toward red, and increasing the value moves the hue toward green.
Green: Decreasing the hue value moves the hue toward yellow, and increasing the value moves the hue toward cyan.
Cyan: Decreasing the hue value moves the hue toward green, and increasing the value moves the hue toward blue.
Blue: Decreasing the hue value moves the hue toward cyan, and increasing the value moves the hue toward magenta.
Magenta: Decreasing the hue value moves the hue toward blue, and increasing the value moves the hue toward red.
-
To adjust the intensity of the selected color’s hue, use the Saturation parameter controls.

-
To adjust the brightness of the selected color, use the Luminance parameter controls.

-
To limit or expand the chromatic range of the adjustment on the selected color’s hue, use the Range parameter controls.

By default, the Range value slider is set to 1.00.

Repeat steps 3 through 7 until you’re satisfied with the appearance of the colors in your image.
Adjust a custom color value in an image
If you require a specific hue as a starting point for your color adjustment, you can use the Color eyedropper to identify a hue in the image.
Select a photo.
-
In the Color area of the Adjustments inspector or the Adjustments pane of the Inspector HUD, click the color with the hue closest to the one you plan to adjust, and select the Color eyedropper tool.

The pointer changes to an eyedropper, and the Loupe appears, showing a magnified view of the target area. By default, the Loupe is set to magnify the image to 100 percent (full size). If necessary, you can increase the magnification of the Loupe by choosing a magnification level from the Loupe pop-up menu. For more information, see Loupe overview.
-
Position the eyedropper over the color in the image that you want to adjust, and click.

The new hue is selected and becomes the starting point for color adjustments of that hue.