Printing overview
You can use Aperture to print single photos, contact sheets, webpages, books, and photos selected in the Light Table, as well as create PDF files that you can send others for review. Aperture also offers a variety of printing options, including using a standard, roll, or custom paper size and assigning a specific ColorSync profile.
The easiest way to print photos is to use one of the Aperture print presets in the Print dialog. Print presets are groups of commonly used print settings that allow you to print your photos without having to select multiple print options individually. If the preconfigured presets don’t meet your needs, you can create your own. For example, if you regularly print both 8-by-10-inch and 11-by-14-inch photographs, you can create a print preset for each of those paper sizes. You can also create print presets to match the print characteristics of different printers.

When you select a print preset, the print options area changes to show the print controls available for that preset. For example, when you choose the Contact Sheets preset, the print options show print controls for setting up a contact sheet. 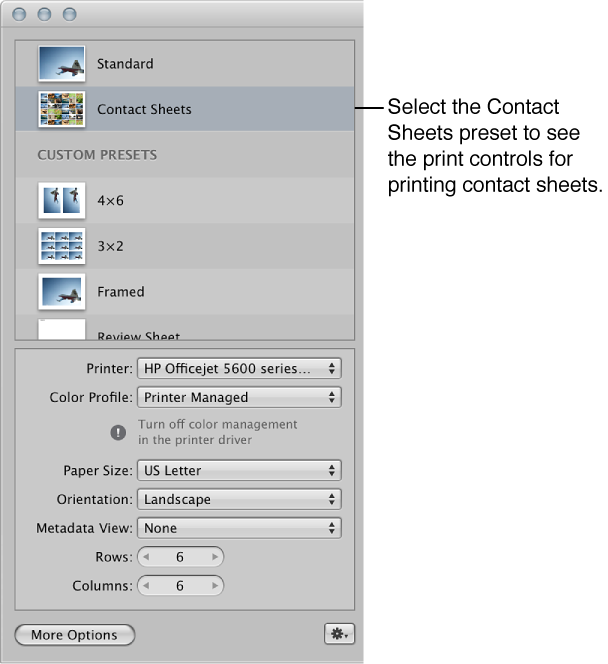
If additional print controls are available, a More Options button appears under the print options area.
You can create new print presets, modify existing print presets, and delete print presets you no longer use. When changing your print presets, remember that modifying an existing preset changes its original settings; creating a new preset, on the other hand, allows you to preserve the settings in the existing preset. For more information about working with print presets, see Create and modify print presets.
Before you print your photos, you can soft proof them onscreen using the onscreen proofing feature. Profiles used for onscreen proofing are also applied to the photo when printed. For more information, see Set up the Viewer for onscreen proofing.
Here are a few suggestions to help you with the printing process:
-
Use the highest-resolution image possible: It’s preferable to work with photos imported directly from your digital camera. However, even photos imported directly from your camera or card reader can be low-resolution, low-quality images. This is why it’s important to shoot with the highest-resolution settings available on your camera. Compression settings applied during image capture may be apparent when you print. Consider shooting RAW files if the setting is available, and shoot at the highest bit depth possible.
If you’ve imported a photo that was reduced or compressed in another application, Aperture cannot increase the resolution of the file. If possible, locate the original full-resolution image file, use the Lift and Stamp tools to apply the adjustments you’ve made to the low-resolution file, and print the higher-resolution image file.
Use a printer that supports 16-bit printing: If the photo you’re printing is a high-resolution 16-bit file, using a printer that supports 16-bit printing results in smoother gradations.
Color calibrate your Aperture system: It’s important to calibrate your display and printer so that your printed photos look as much as possible like the photos you see on the computer screen.